Prepaid products
Sell WooCommerce products that add a prepaid credit balance to the customer's Leat account when purchased.
Prepaid products are standard WooCommerce products that, when purchased, top up a customer's prepaid balance in their Leat account. You mark a product as prepaid in the product editor, pick which order status should trigger the top-up, and the plugin handles the rest. It works with simple products and individual variations, so selling credit bundles at multiple price points is straightforward.
What prepaid products are good for
A few common setups:
- Store credit -- customers buy credit they can use on future orders.
- Loyalty balance top-ups -- give customers a direct way to add funds to their Leat account.
- Credit bundles -- sell the same concept at different amounts using product variations (for example 10, 25, and 50 credit options on one product page).
It's worth knowing that prepaid balance is separate from loyalty credits earned through purchases. A customer who earns credits by shopping gets those through your earn rules. Prepaid balance is credit they've bought and loaded themselves. The two don't overlap.
Setting up a product as a prepaid product
Open any product in the WooCommerce product editor.
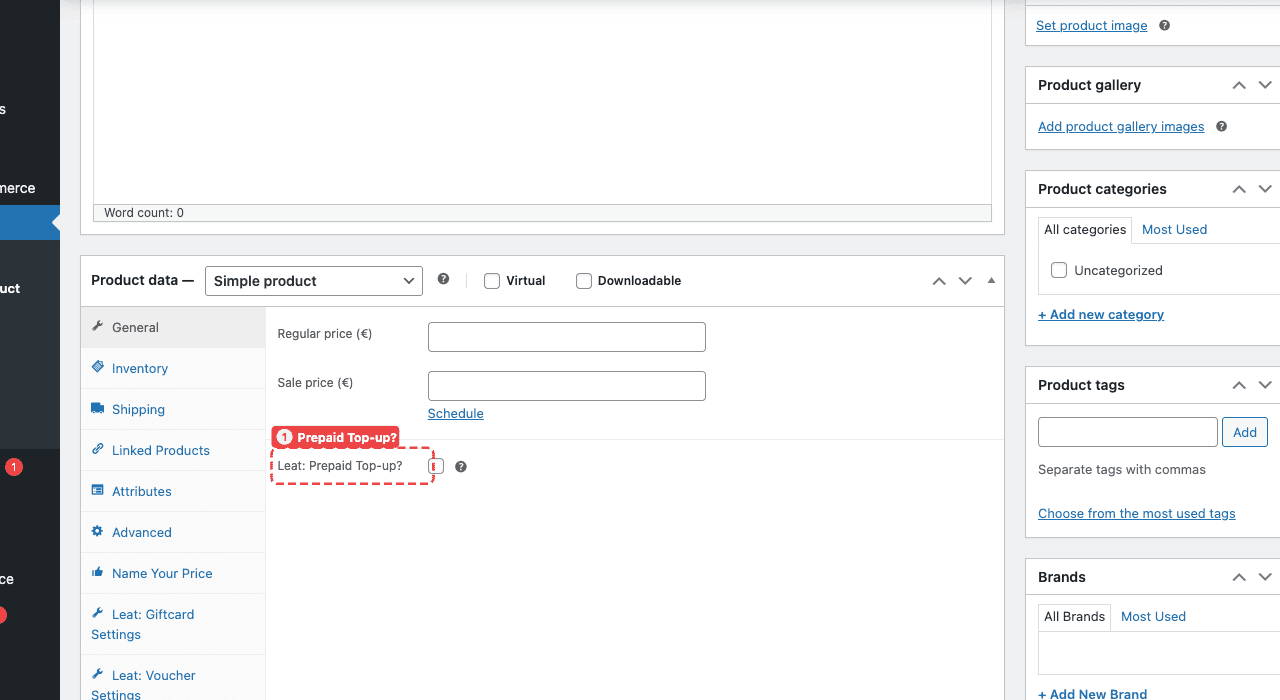
Simple product
For a simple product, go to the General tab in the product data panel. You'll find a checkbox labelled Leat: Prepaid Top-up? (1). Tick it and save.
Variable product
For a variable product, open the Variations tab and expand an individual variation. Each variation has its own Leat: Prepaid Top-up checkbox alongside its Regular price (1), so you can enable it per-variation. The top-up amount follows the variation's price, so a customer who picks the 25 variation gets 25 added to their balance.
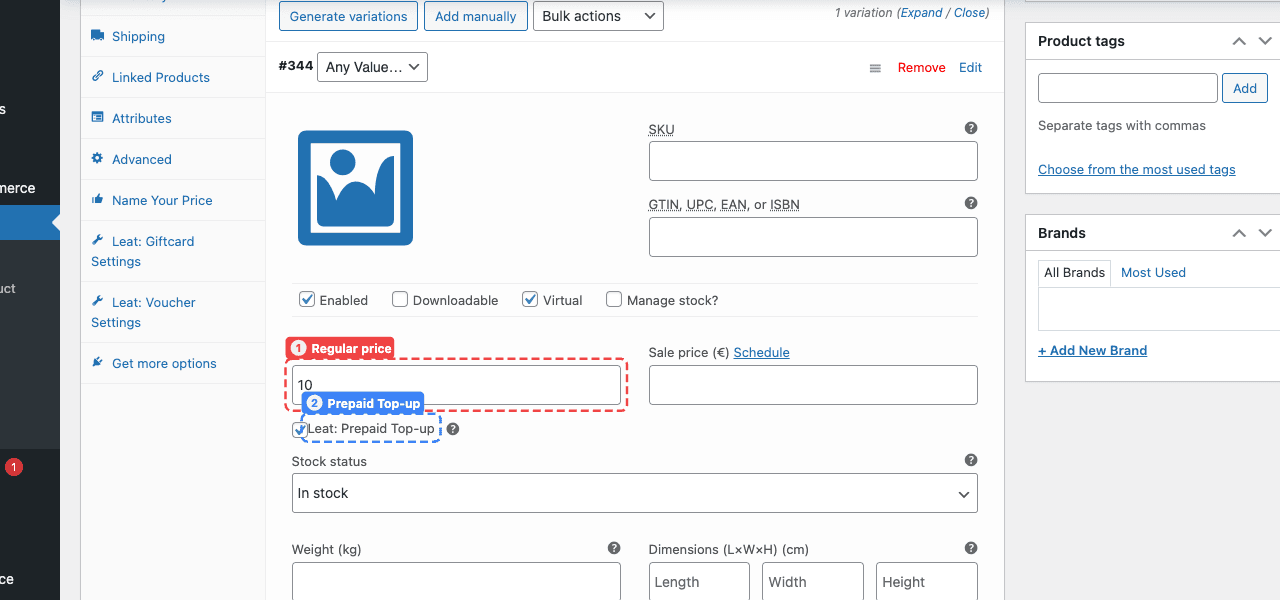
In practice, keeping all prepaid variations on one product and all standard variations on another tends to be less confusing.
The top-up amount is based on what the customer actually paid. Buy a product at 25, get 25 added to their Leat balance.
Configuring when the balance top-up happens

The top-up doesn't fire the moment an order is placed. You control the timing through order status. Go to Leat > Settings > Prepaid Settings and find the Prepaid Top-up Order Status field.
The default is completed, meaning the balance is added only after you manually mark the order complete. If you're selling digital credit and want it available the moment payment clears, switch to processing.
Changing this setting only affects new orders. Older orders won't be re-processed.
Reversing a top-up on refund or cancellation
If an order is refunded or cancelled, the plugin can automatically roll back the prepaid transaction. Under Leat > Settings > Prepaid Settings, the Reverse Prepaid Top-up Statuses field controls which order statuses trigger a reversal.
By default, both refunded and cancelled are enabled. You can adjust this list to fit your returns process.
When a reversal runs, the plugin creates a new reversal transaction in Leat rather than modifying the original. That means you'll always have a clear record: the original top-up transaction, and a separate reversal entry to show what happened.
How the balance shows up in Leat
When the order hits the trigger status, the plugin calls the Leat API and creates a prepaid transaction on the customer's Leat contact. If the customer doesn't have a Leat contact yet, one is created automatically from their billing email.
The balance appears in their account immediately. From there it follows whatever rules your loyalty program has set up in the Leat dashboard.
WooCommerce order notes track everything as it happens. A successful top-up records the amount and the transaction ID from Leat. If something goes wrong, an error note tells you what failed so you can investigate or add the balance manually from the Leat dashboard.